
There are many processing software for planetary imaging, and many are excellents. But to finalise the processing, and whatever software I have used, I always go back to Registax 6 ! Here is why…
Registax 6 is one of the best planetary processing softwares. I have always difficulties to perceive real differences between softwares when aligning or selecting frames but there is one step where Registax 6 looks unbeatable to me: the good enhancement of details. To me it is strong on two points: noise reduction, and resizing.
Get rid of noise with Registax 6
Too often noise it the element that will bring a limit to the enhancement of planetary details. It presents the particular disadvantage to most affect the first layers of wavelets, those one that also shows the smaller details.
Traditionally, detail enhancement is achieved combining two tools: the wavelets and the gaussian blur. The first enhances the contrast, the last is used to fight the apparition of noise at very small scale. Wavelet filters are found in almost every planetary software but to use gaussian blur one could be forced to open a second software. More over, applying the gaussian blur asks you a subtile estimation of the strength you must use: too weak, noise is still there; too strong, true details are blurred as well! And under some softwares one has to apply fastidious repeated sequences: blurring, re-loading of the image, new blur, etc.
With Registax 6, the gaussian blur is completely integrated to the processing software and you drive it like the wavelets, with sliders. A very comfortable innovation :)
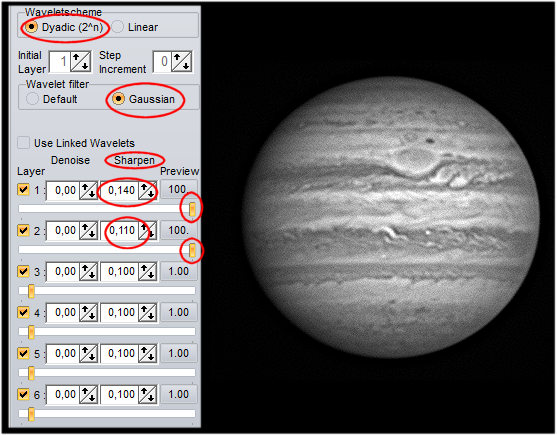 Here is the first step of my usual processing routine. I’m using the Dyadic wavelets. Make sure as well that the gaussian filters are on.
The relevant layers to be used will vary following the sampling, the target and the conditions, but I first use the 2nd layer, then the 1st, partially the 3rd but never the 4/5/6.
Push the sliders to the right to the point where the enhancement of details is nice to you. Here the 1 and 2 are set up to 100 % at first, but by using the Sharpen filter you can set them to more than 100 (here, 140 and 110 respectively).
 The result is well contrasted, but the image is too noisy !
At this step you can use the gaussian filters with the Denoise filters at left.
You can make them vary up and down with the arrows. The increment is then by step of 0,05, which is not very precise. You can refine directly the value inside the box, with a variation of one tenth (0,06 to 0,07…) but you can even go to one hundredth, like here at layer two (0,125).
Take care of the smallest details: noise reduction must not erase them! Most of the time the value I used is under 0,1 (my processing was a bit hard here ;) )
Enlarging the images with Registax 6
Why enlarging the images ? This is an optional step; none the less it can be interesting because the final goal is to make the smallest details well visible, and a greater image size will of course help it. Before using Registax 6 I was never doing this. The enlargement of images has a drawback: contrast is weakened and noise is enlarged as well. Registax 6 reconciled me with enlargement ;)
Indeed, the main processing window already allows you to reduce noise. But the software offers as well different resizing filters to be chosen following your needs !
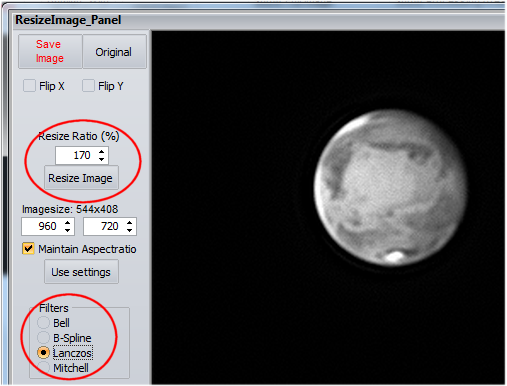 Mars is a very small planet and benefits well from an enlargement…
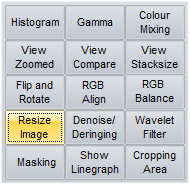
On the right menu, click on “Resize image” and this will open the dialog box. You can enlarge the image up to 200 % (you can also reduce it).
Other options can be used – Flip X and Y can set right an inverted image. You can also adjust to the pixel the final size of the whole frame.
But the most interesting tools are the different resizing filters at bottom left.
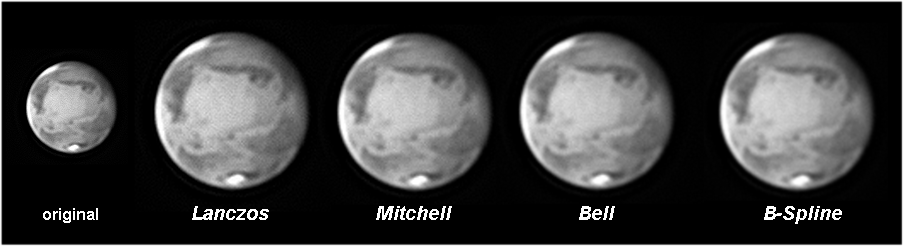
Here are the effect of filters (click on the illustration to see its full content). They will offer a different level of smoothing so you can choose the more adequate. Lanczos looks to enlarge without effect on noise: this one is to be used for the very best images (or those one to be derotated under WinJupos). Then Mitchell and Bell show increasing levels of smoothing. Finally, B-Spline is the most efficient in noise reduction but beware that small details will be blurred as well! This one is to be kept for the most difficult images.
As a last word, the resizing filters must be combined with the “Denoise” filter of the main window :). If for example the Mitchell filter looks to be too weak, before using Bell, just see if a slight increase of the denoise in the first layers do not solve the problem…


