
To make good planetary images, we are always told that it is essential to collimate the telescope, otherwise its theoretical performances will collapse. This is completely true. However, observers sometimes find collimation is difficult, tedious, and at a result they do not adjust it as often as they should. Here are 5 tips you must know that will help you to collimate more precisely and more easily…
1) Choose a star close to the target you want to observe
This is the first advice and it is quite obvious if your telescope is motorized. If Mars is near Spica, then collimate the telescope on Spica. Some telescopes can get misalignment when tracked a long way on the night sky just because the optics will move. If you need to collimate several hours before observing (for example to image late in the morning, minutes before sunrise), then you can find a star close to where the planet will be found, but before going to bed around midnight or so ;). You will save a precious time.
2) Use a red filter
This is probably the best advice to learn and it is very helpful. Collimation is greatly helped if you use a visual red filter (I use the Astronomik R from the LRGB set). Advantages of using such a filter are :
- The seeing is better. Through red light the atmosphere is less shaky and you will have a better chance to distinguish the Airy pattern, or the diffraction rings close to focus
- The diffraction pattern is bigger (than through visible light) and then easier to catch
- There is no atmospheric dispersion. Through white light if the star is not very high, the diffraction pattern will be elongated north-south, and the colours will be separated. This will make the visibility of the Airy disk quite more difficult.
- The optical defects of the telescope are slightly lessened. Aberrations deteriorate the Airy pattern and your ability to collimate
If seeing is really poor, you can use a deeper red filter (juste like W25 or RG610). It will enhance noticeably the above advantages. However, if seeing is good, I’m not sure that using a very deep red glass is a wise idea : because red filters tend to lessen aberrations, it might mask a slight misalignment that you will see only in green light, for example.
3) Makes profit of the optical aberrations close to focus
Most of the time, your telescope, even if it’s very good, will present a difference in the inside focus and out-of focus diffraction patterns of a star. When you defocus the image of a star with the focuser, you will probably see different patterns of light rings in or out (if the patterns are identical, congratulations your telescope is perfect and you don’t need to read this 3rd tip ;) ).
Whatever are the optical problems of your telescope, the idea is to collimate where are found the most contrasting diffraction rings. This will greatly help the detection of a slight misalignment very close to focus. When you collimate, you do not go right to the focused star pattern, in a first time you evaluate misalignment out of focus. This tip is relevant for the step when you come close to focus (remember the collimation page of Thierry Legault).
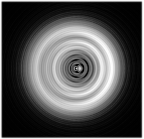
At right is a simulation of a real star test (thanks to Aberrator 3) of a 30 % obstructed telescope having a moderate amount of 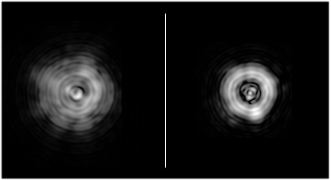 spherical aberration (inside pattern at left, outside pattern at right) during a night of average seeing (this is why the rings are not homogeneous). This is not the place to describe precisely what it is but just note that with spherical aberration, on one side of focus light is re-distributed near the center of the pattern and the whole picture is quite fuzzy; on the other side the light is concentrated into a bright outer rings. Well it is more easy to detect misalignment in the outside pattern at right here !
 Spherical aberration is probably the most common defect and there is a great chance that your instrument will present this “help”. At left is now a real star test of one of my former instrument, a 180 mm newtonian with a visible amount of spherical aberration (in-focus pattern is shown as well). Can you guess what was my preferred side of focus for collimation ?
This aberration is not the only problem and there are many out there but most of them are changing the distribution of light in each side of focus; so just find for yourself the one you find most confortable.
Together with the use of a red filter, these two tips are the most useful to collimate, even when the seeing is not good.
4) Collimate with your camera
In some special situations, collimating by the use of a planetary camera can be interesting or even very recommended. If you plan to image difficult targets like Neptune or Uranus, it is in my opinion unavoidable, because misalignments will translate into artifacts on the image.
Collimating with the camera has a serious advantage : it will allow you to image the focused Airy pattern that would remain unsteady to your eye under average seeing. You can check if the telescope is perfectly collimated even with a big instrument with which seeing the Airy pattern at the eyepiece is very difficult.
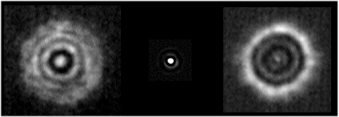
The method is simple : put your camera on, with all the imaging train installed (it is wise to collimate under the same conditions of imaging). Insert a red filter (remember tip 2), focus the star, make a short movie (very short : 100 or 200 frames, no more) and process it with any software you like (Registax 5 is perfect here). The software will average the seeing and reveal the Airy pattern with the existing misalignments. Of course, adapt the movie to the conditions : the poorer the seeing, the longer the capture.
In general you will use a bright star to do so. This means that you will be able to use very fast speeds. As the object is very small, you can use very small crops. So all the process of getting the final image of the Airy pattern is very fast. Corrections can be applied quickly and it is not really time-consuming.
5) When stars are not available…
On some situations, you may not have access to a star to collimate. For example, when making observations during twilight. Of course, today you can use tools like collimating lasers and it will work. But here are some secondary ideas to check if there is any problem – it will not be as precise as a real collimation, but one day it may help you.
If you are imaging Jupiter, you must know that you can detect and adjust misalignments by looking at the defocused galilean moons. They are small enough to reveal defects very close to focus, and the process of collimation will then be the same as if they were stars. Of course, you won’t be able to collimate in focus, because the moons have a bigger apparent diameter than the resolving power of your telescope (unless it has a diameter smaller than 150 mm). This method should work as well for Saturn by using Titan although I have never tested it (but I have often used the galileans for Jupiter).
If you are imaging Neptune or Uranus, you can also defocus them to look for misalignments. They have a bigger apparent disk than the Galilean moons so the precision will be lower, but again, this is a security than you can use for these hard targets.
Unfortunately there is no such means for Venus, Mercure and Mars… to my knowledge at least ;)
 : how to set your camera")
 is less efficient before 750 nm")
")