
The planet Neptune is now observable in Capricorn and will be at opposition this year on August 27th. It is probably the most difficult planet to image, due to its very small size (2,4″) and its low magnitude. However some tips can be found !
Neptune is the only planet of our Solar system that you can’t see by naked eye (visual mag. is around +8). It is even not really interesting : unless you have a very big instrument used under a perfect sky, you have very little chance to image any detail.
So why would you want to image Neptune ?
On my side I have often been attracted by challenging observations. Just to change a bit from our usual big gas giants or our mythical planet Mars. It is wonderful to see at the eyepiece this very little and dim disk, but with such a different colour ! Why not make an image of it ?
How to find Neptune
You can find Neptune easily if your instrument has Go-To. If this is not the case, uses a software that will show where is the planet in front of the background stars. I use Skychart from Patrick Chevalley but many tools will do the same. Just make sure that your chart shows 8th magnitude stars.
A priceless accessory...
If you live in the southern hemisphere, you will be happy to see the planet high in the sky (declination at opposition will be around 10°S). But for those of us who live in the other hemisphere, the planet is still very low in the sky. At my location in Nantes (France) the maximum altitude in 2013 is 32°.
At this altitude, a Earth-bound phenomenon will be especially harmful : the refraction of light of our own atmosphere. It means that the colours of an astre will be shifted, the blue to the north, the red to the south. On an usual planet like Jupiter, atmospheric refraction will blur the details. But on a small disk like Neptune, the problem is very damaging : it will outright distort the whole shape of the planet, ruining your chance of getting a really good image.
The problem will mostly affect white light and blue light. To fix this, you will have to use an atmospheric diffraction corrector. The “ADC” uses two prisms that correct the refraction of the colours by our atmosphere.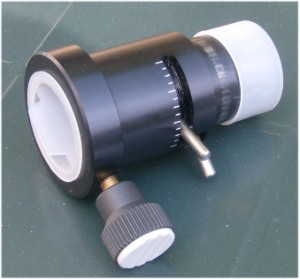
At right here you can see the one I have, from Astro System Holland. This is not the only one the market but it works very nicely.
What sampling to use ?
Being very small and dim, Neptune will hardly bear over-sampling. Keep imaging at the usual recommended sampling that is 0,19″ per pixel. For example, a 1/4 CCD chip (with 640*480 pixels) will be fine around F/25.
Focusing the image
Well this will be the hardest part, surely ;). It is hard to focus Neptune on the CCD and there is no real trick but watching closely at the screen ; try either with the Red or the Green filter of the RGB set : the Red filter is less affected by the seeing but the Green filter will provide a slightly brighter image. Or if you plan to do LRGB imaging, focus with the L filter on : it will passes much more light, but be aware that the seeing could be a little more wavy through full white light. Of course, as usually you will not wait for details to pop up on the disk, it will still be possible to re-focus a given filter during the session.
If possible, you can even get the telescope focused on a brighter star before turning to Neptune, but you won’t be able to unset all the imaging train (barlow, filter wheel, camera…) to find again the planet.
Acquiring the video files
Time does not really count when you image the planet Neptune. This is maybe the only good news here ;). You can keep your video running for as long as you want, providing you have enough time to take the whole 3 (for RGB) or 4 (for LRGB). We need as much frames as possible so don’t hesitate to take up to 10 or 15 mn video file at minimum.
The time exposure will be long. For the above LRGB image, the L filter was used at 10 frame per second (fps) or 100 ms. The RGB filters would require exposures of around 200/250 ms (5 to 4 fps only !). However my setup is oversampled (0,14″ arcpixel, F/32), so if your telescope is used at a more adequate sampling, you should be able to use faster speeds.
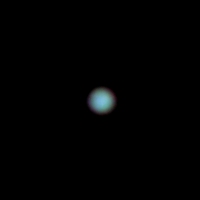
You will be surprised to see that unlike the other usual planets, Neptune is not going to get very dim in blue light, even with cameras highly sensitive to R or IR wavelengths ;). The planet is actually brighter in blue light than in every other band – this is the only one of the Solar sytem !
Now how much do I gain the video ? Usually we are recommend not to gain too much as the final image will get too noisy. While this is still true of course here, the signal-to-noise ratio in the case of Neptune is not as unfavourable that we may think. We will see that the processing of the images is surprisingly easy.
Finally, here is a raw frame from the L movie I took on august 11th, 2012, under very good seeing and transparency (but with gusts of winds) – the frame has been cropped, the original is in 640×480. Taken with a PLA-Mx camera with the icx618 Sony CCD.
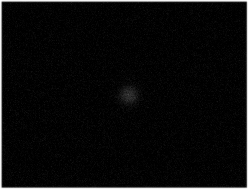 The telescope used is a 250 mm gregorian at F/32 (0,14″ per pixel – this is the prime focus of the instrument, the focal length is a bit too long here). Time exposure is 100 ms (10 fps) with a gain of 90 % (quite high for that camera). The planet is still underexposed, but the relatively “high” frame rate (for the target !) will help in getting a sharper image.


