
In 2012, we have seen for probably the first time in History, amateur observers imaging non-ambiguous details on the disk of Uranus. With the following tutorial, learn how to do it by yourself !
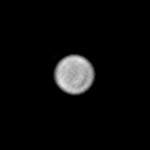
In 2011 and 2012, there have been great images of Uranus with details taken at the Pic du Midi. In the summer of 2012, François Emond has been the first amateur to succeed in imaging belts without any doubts, with the same method, quickly followed by several other amateurs. Learn here how they did it :)
As a prerequisite, the seeing MUST be at least very good, and if possible, excellent to superb. No result will be obtained under average seeing.
What equipment do I need ?
Imaging the belts of Uranus is the last frontier broken by amateur astronomers. It is certainly one the most difficult observation, if not THE most difficult.
You will need preferentially a big instrument. Four observers have succeeded in doing so with instruments of 250 mm (me, Flavius Isac, who much regrettably passed away last winter, Richard Schrantz and Paul Maxson), but this is currently the lower limit of diameter. A C11 will already be fine, but telescopes of 350 to 400 mm will be best here.
You will need to use a performing b&w camera, preferentially those equipped with a CCD highly sensitive in the red and near-infrared part of the spectrum. Colour cameras won’t be up to the task.
You will also need a filter able to reveal the belts !
What filter should I use ?
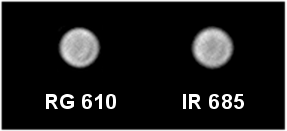
The experiences made in 2012 prove that there are two filters that will allow you to catch details on Uranus : a very large IR-pass, and a larger R+IR filter. The Baader IR 685 has been the most successful because it combines both a very good contrast effect on belts and the best possible light transmission for near infrared.
However, the planet is very dark in that color band, this is because a R+IR filter (that transmits both the visible red light AND the near infrared) is a nice alternative. The contrast will be lower, but the resolution will be better (remember how much resolution is reduced when you go toward infrared) and there will be noticeably more light available to speed the frame rate.
So you may choose the filter considering two criteria :
- If you have a big telescope, and/or if the seeing is excellent, prefer a near-IR filter, the best one for the task being the
 Baader IR 685
 - If your telescope is smaller than 300/350 mm, or the seeing is “just” very good, try a deep red filter, such as the Baader RG610 or the Wratten 25.
At right are two images of Uranus showing at least the equatorial belt. With my 250 mm, the RG 610 image has certainly the best definition.
Focusing Uranus
Now this is the hardest part of the process. Focusing Uranus in the longer wavelengths (deep red or near IR) can take time. The best idea here could be to focus the telescope, with all the imaging train installed, on a star before turning to Uranus (Damian Peach gave me the tip). However you must be sure to find Uranus easily after that, because it won’t be possible to unset the camera or anything else.
If this is not possible, you will have to patiently turn the focuser back and forth again and again, looking closely at the image. Or you can as well make a short video, process it and see if the planet is well shaped.
Setting the camera
As for any planet, the idea is to use the fastest possible speed while holding a correctly exposed planet. However, having Uranus correctly exposed in near infrared is very, very hard and would require very long exposures. So do not hesitate to favor (reasonably) speed over exposure. After all, you don’t care about the rotation of the planet. There is very little chance to image anything else than belts. Bright spots are rare and so far we do not know if they are accessible to amateur-sized telescopes.
So do not hesitate to make very long videos. The more frames you get, the better. The above images have been made from movies of 30 to… 80 mn !! Time exposure was 150 ms for RG 610 (6-7 fps – 12000 frames) and 250 ms for IR685 (4 fps – 18000 frames).
Using WinJupos
The WinJupos software can be used to “de-rotate” a long video file on Uranus. This means that even with a file 30 mn long, this software will be able to correct the rotation of the planet and reveal spot or patches if they exist. But just to image belts, the use of WinJupos is not required.
WinJupos can also de-rotate files taken with altazimuth telescopes.
In coming posts we will see how to avoid errors on Uranus and how to make color images of the green planet.


