
Now that I have my video files of Neptune, how do I process them ?
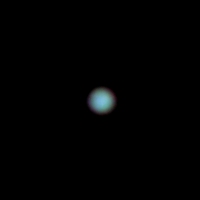 There is very little chance that you get details on Neptune. It would require a very big diameter and the use of a near IR filter. In colour, there are certainly none to see at our level of resolution. So what is our goal here ? We want the image to be:
- Nicely shaped, circular with a limb as sharp as possible
- Correctly colour-balanced
Which method must I choose : RGB or LRGB ?
There are traditionnaly two methods to assemble the colour components of a planetary image. The RGB will easily reproduce colours, but the LRGB is using an image taken at higher speed and better dynamic, the Luminance, because the L filter transmits the whole visible spectrum.
So in the case of Neptune, it is natural to conclude that we will welcome an image taken through a L filter because it should be better. It will be the case, but you will absolutely need the ADC that we talked about in the part 1, or the planet will never be circular. So if you don’t have an ADC, you would rather choose the RGB method, because each RGB filter will be less affected by atmospheric diffraction. However, as we have seen again, the B filter will encounter problem is the planet is found at an altitude of less than 35/45°. We are going to see that the processing in RGB will not be that more difficult than in LRGB.
Frame selection
Now we are going to process the video files. There are many excellent free softwares here but the one I prefer to process problematic dim raw frames is Registax 5, that I find very performant to track such difficult raws on the screen. I have not tried so far AviStack or AutoStakkert on Neptune (and I should do one day) so unfortunately I can not comment.
We are going to suppose that the videos have been taken under excellent seeing (otherwise, the results would be worthless for that target). I do not like to select frames too severly for Neptune because I want to maximize the dynamic of the final image. If the video is homogenous in quality, I can choose up to 2/3 of the frames. For the L video presented on part 1, 5000 frames have been recorded in 10 mn. It could have been longer.
Processing the final images
The processing of the images is quite simple. There is a trick to keep in mind : Neptune will benefit from a mid to high layer of wavelet. This will sharpen the image with good contrast while avoiding the noise to appear too quickly. Also, it is not necessary to process the image strongly. Because a strong layer will contrast easily the image, sharpen the limb, and after all, there is probably no detail to reveal on the tiny disk. Remember all that you want is sharp circular Neptune.
At right, you can see different processing of the G frame of the Neptune image presented above. Left is processed with the 1st layer of wavelet and is clearly too noisy – and even not sharp. At middle, the 2nd level of wavelet sharpens the limb but still leaves a regrettable level of noise. Finally, at right, the 3rd layer of wavelet (with a slight 2) brings the level of quality we are looking for : sharp and not noisy.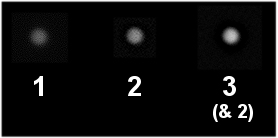
Now process the same way all the components (3 or 4) and assemble the colour image as usual. Do not hesitate to make a stronger processing of the B layer as it is usually weakly contrasted.
Adjusting the colour balance
The colour balance is the last thing to adjust. Neptune is clearly a bluish planet, as we have seen in part 1, the planet is brighter in blue light. The deep blue of the Voyager images is good but is probably enhanced. At the eyepiece of the telescope under a transparent sky, the tint looks pale blue sky. The equilibrium of my above image if Blue = 100 is 68 for Red and 92 for Green. The planet is still bright in green light but noticeably darker in red. The still high albedo in green light does not speak for a deep blue balance.
Resizing the image
As Neptune is very small, you are probably wanting to resize the final image. It is indeed a good idea, but resizing needs a good original image, as it will lose sharpness in the process. My images here are resized 150 % ; this is not too much, and it could have beared a 200 % probably, but to my eyes it was the best compromize.
Keeping things natural
Sometimes we see Neptune and Uranus images that looks to try to fake a HST-like shot. They are unreasonably resized (500, 1000 % ?) and harshly processed. But this is the best way to get false details, artefacts and ugly blobs ;). Keep things natural.


