
After the IR-cut article of last time, here is another unavoidable accessory with this color cam (…and every other!): the atmospheric dispersion corrector, or ADC.
The atmospheric dispersion corrector is an accessory that allows one to correct the dispersion of light emitted by planets (or stars…) when it passes through our own atmosphere, that acts just like a glass prism would do. We have been talking about the ADC for many years now so I will not detail why and how it works ; you can refer to the original page by Jean-Pierre Prost or a most recent and excellent one by Martin Lewis. I will present here a few tests made with the Pierro-Astro ADC (thanks to Astrograph for lending me one)
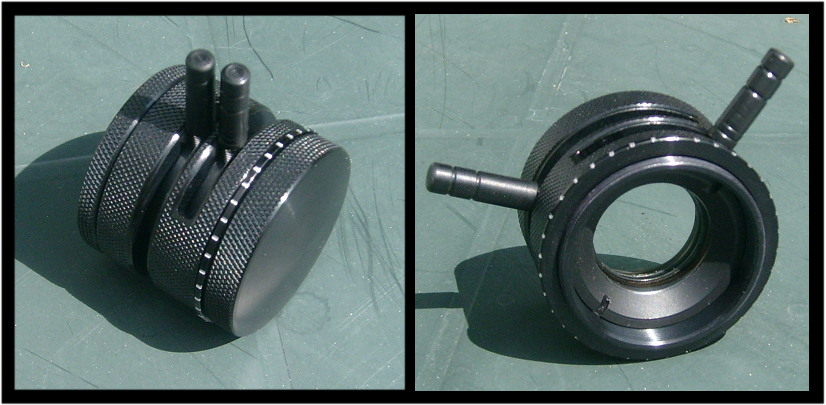
This model is of the highest quality both for mechanic and optic (refer to the constructor’s pages for details). In comparison with the former ADC’s generation (that is no longer on the market) one of its main interest is the possibility to adjust the levers all night long without the need to unset the camera (the direction of correction must always be vertical). Another advantage of the Pierro-Astro ADC is its excellent UV transmission (following Martin Lewis’s page quoted above, 25% more than some other brand!) and this is seriously fine for Venus imaging.
The idea there was to perform some tests with/without the ADC to see if it’s as unavoidable as many claims :) (and this includes me!)
The ASI224MC, with or without the ADC
Setting the ADC is very simple with a color camera just like the ASI224MC as the chromatic dispersion can be seen right on the laptop screen (you need of course to debayer the image for this). Just move the lever so as to make disappear the red at south, and the blue at north. Before the results it’s necessary to recall the main objection, or observation, some use to say during the early times of the ADC: when making digital imaging of a planet in color, it’s always possible to re-align during post-processing the three RGB color channels. But is the correction as good as you will get with the ADC?
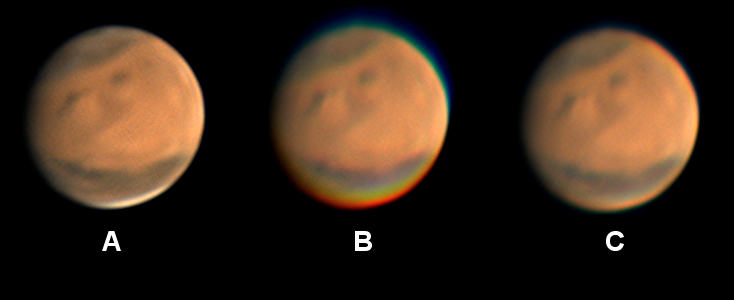 At left is a comparison of the result on Mars with the ASI224MC. (A) with the Pierro-Astro ADC ; (B) without the ADC ; (C) without the ADC but with color channels aligned during post-processing.
At the very low altitude where Mars was during the observation (21°), the result is clear: only the ADC is able to reach full correction. As an exemple, the edge of the south polar cap visible as a (relatively) sharp white edge at the bottom (A) is a blurry, reddish edge on (C). This result is even remarkable as the seeing was poor, this showing that the ADC is able to seriously improve images even when conditions are unfavorable.
The reason why the informatic processing alone is not able to correct the aberration is well-known: the dispersion of colors does not exist only between the three RGB components ; but as well inside each color bands. This is why the SPC’s edge is not well visible on (C), the green and above all blue layers being still affected by the dispersion. And this problem is impossible to fix during processing: you will have to do with it!
Let’s note the absolute interest that there is to use the ADC when one observes visually at the eyepiece: of course, the human eye alone is not able to make the RGB re-alignment…
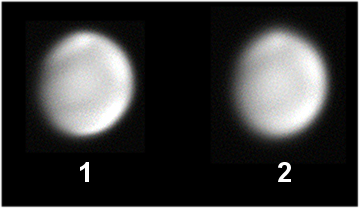
Testing with blue filter!
To end the demonstration I have made another comparison with/without the PA ADC this time using the blue filter (and a b&w camera). Here again the interest of using it is absolutely clear. With the ADC (1) the image is noticeably sharper than without (2).
I advice you as well the reading of the following pages that present some coherent testing:
 : how to set your camera")
 is less efficient before 750 nm")
")
2 Comments
Excuse-me – it’s hard to find your real name when I want to make some references to you. There are many good things on your blog. I’m correcting.
Well, I’m Piotr not “Rik Launim” :D