
Let’s start first by what will not change in comparison with any other camera: how you are going to choose the time exposure, the gain; the length of the video… This must be set as usual, following the object, the conditions, the filter used, etc.
Only the very high sensitivity of the sensor in IR can influence the length of the videos when you choose a broadband IR filter (to record the whole monochrome part, for example); sometimes it can reduce seriously the interest of derotate the video/images. Last summer when I used on Jupiter the Astronomik 742 or a Johnson I filter, I decided not to derotate 3 mn long videos that gave me tens of thousands of raw frames. However, CH4 or 1 micron filters will still benefit a lot from that technic.
Is an ADC necessary? (Atmospheric diffraction corrector)
One first question is whether an ADC is still necessary for IR imaging only. Until you should observe at extremely low elevations (less than 15°) and very big telescopes, the risk of seeing the diffraction blurr the image after 800 nm can be considered as insignificant.
What’s more, modern ADCs are all built with coatings optimized for visible and UV transmission, some wavelengths much seriously affected by the problem. But as a consequence, some, if not all of the available models are going to more and more absorb infrared as the wavelength increases. If the absorption can be considered as negligible around 700 nm (5-10%), it is going to deep noticeably at longer wavelengths, probably around 20-30% (or more ?) after 800 nm (see for example the transmission of the otherwise excellent ADC Pierro Astro – the only one for which we now the effective transmssion in IR). Since there is no interest of correcting the diffraction there, the loss of light for a CH4 filter would be regrettable!
Sampling and binning
This is even more an interesting point, as the use of an ADC is likely to introduce another disadvantage: as it is going to be installed after the barlow lens, it is often going to further increase the focal length (depending on the barlow or Powermate, of course), which is not an interesting behavior for deep IR imaging. Indeed, the optical resolution in IR being inferior to what it is in visible light, the necessary focal length to reach the high resolution level is reduced accordingly.
A simple rule of three will help us to calculate what is the adequate F/D ratio for the IMX462 sensor, used for IR imaging. If we just star from the simple rule that says that the good F/D ratio can be found by multplying the size of the photosite by 5, then for that sensor (2,9µm), the adequate value is around 15. But if we introduce a ratio factor visible/IR – for example 500/900 or 550/850 – we now find that the “high res” F/D ratio is reduced to 8 or 9. As saying that it can be clearly an option to use the IMX462 for IR imaging directly at prime focus of any telescope whose native F/D ratio is anywhere between 8 and 12…
Below are images at their original size taken with an ASI462MC and the two settings I use with it, for visible (2,7x APM barlow + Pierro Astro ADC + filter wheel) and for IR imaging (the same, but without the ADC). The calculation following the wavelength shows that even with the reduced focal length, the image is still oversampled!
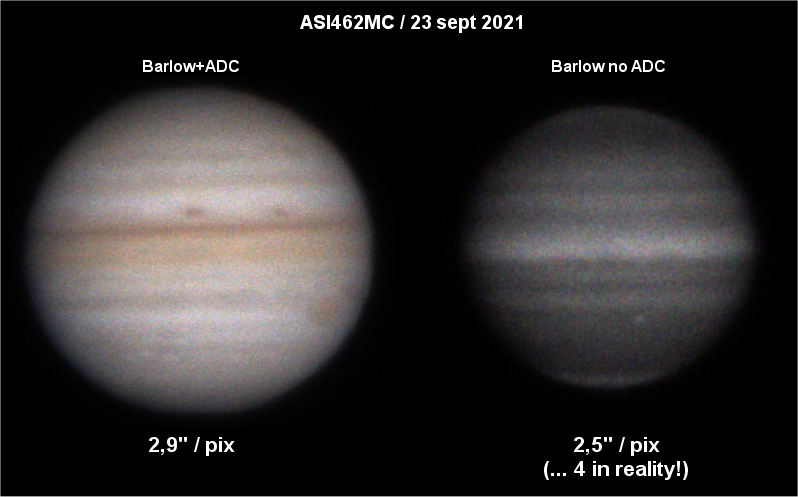
Before the IMX462, one frequently adopted good practice was to simply use the same optical train as for visible imaging, but whith 2×2 binning, when shifting to the CH4 filter. This way we both benefited from a brighter image and a more adequate sampling. Now, that very high IR sensible sensor can be used at 1×1 binning even with oversampling. However, if it is usually not adviced to bin a CMOS sensor, but if one does not want to change the optical train, it is of course still possible to use the binning 2x as long as we stay on the monochrome part of the sensor (in the non monochrome part, the binning will reduce the resolution).
How to set the “colour” balance
The IMX462 being a colour sensor, but used here on its monochrome part, the results must be turned into black and white images. This is done by modifying the respective R, G, and B gain to avoid any tint that would then be artificial. It is not always easy to get that done during before capturing the video, however in any case it can (and must) be fine tuned during the processing stage.
Until recently, some capture softwares did not give access to the green gain, only to red and blue; as a result, the images could take on a kind of purple tint, as below – this being the result of the under-exposed green photosites:
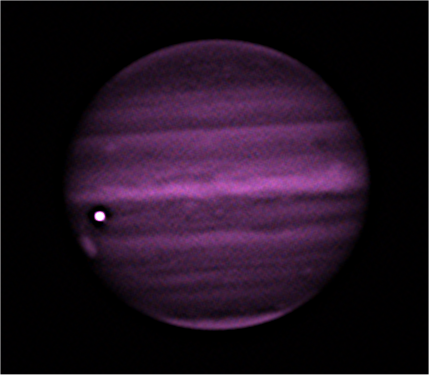
In this situation, enough is to increase the green value during the processing stage, to obtain a neutral aspect. Then it is possible to turn the image into grey levels.
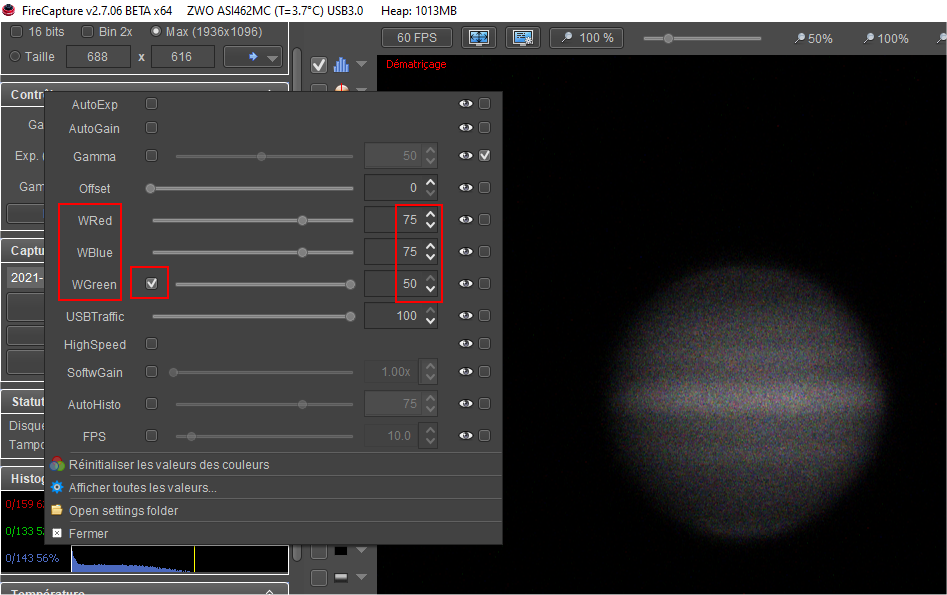
Yet, the capture softwares are now increasingly allowing the access to the green setting. This is certainly a good thing because othewise, half of the photosites – half of the sensor! are going to remain under-exposed. On the monochrome part, it is possible to determine what is the exact equilibrium between the green gain and the two others, as on the following screenshot with Firecapture 2,7: the green gain must be set at two third of the red and blue gains (the green gain being limited to 50, the image can’t be neutral if R and B are set beyond 75):
If you must use a filter that starts to transmit on the non-monochrome part, it is not possible to determine stable values. But keep in mind again that, as for visible colour imaging, getting a perfect balance is not essential during the capture, as it can be more easily adjusted during processing: the main idea is to avoid under-exposure of the green photosites, and then later, turn the image into b&w.
 is less efficient before 750 nm")
")
