Apart of imaging belts on Uranus, you may want to make color images of the planet :). Uranus is far away, small and not very bright, yet it delivers at the eyepiece a very charming view of a definitely planetary object. Here is a tutorial to achieve good color images of the planet…
Uranus will be at opposition this year on October 3rd with an apparent diameter of 3,7″ and a visual magnitude of +5,7. You can really spot it with naked eye if your sky is transparent and if you know exactly where it is.
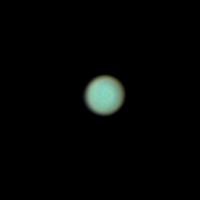
Imaging Uranus in color shares common points with the method proposed for Neptune color imaging but it has more complexity (and more interest, as well !). Here is what in my opinion is a successful Uranus color image
- The elliptical shape of the planet is apparent (it is not circular like Neptune, the polar flattening is very pronounced)
- The color balance tries to respect the precise nuance of tint particular to Uranus, which is different from Neptune
- Finally, it looks like belts can pop up in color… I mean that a completely successful color image of Uranus should be able to reveal details :)
Finding Uranus
The planet is not very easy to find (except if your telescope has go-to) but quite more than Neptune. You can find it with circles or look for your way at the finder of the telescope thanks to a sky chart. Currently in Pisces in front of a relatively poor star background it is not difficult to spot. The tiny disk is easily recognized as a planet at the eyepiece.
Setting the equipment
The planet is hard to focus. Usually I achieve that task with the Red filter of my LRGB set because it delivers a relatively steady and a crisp image, however, I sometimes use the Green filter as well because the image has a brighter limb. The Luminance L filter will deliver an even brighter image but it can bring problems (see below RGB or LRGB). As explained on the Imaging belts tutorial, you can as well focus first on a star if you are sure to find again the planet soon after.
The frame rate will not be very fast, but with a luminance filter it can reach 10 to 20 fps (100 to 50 ms). The RGB filters will stay at 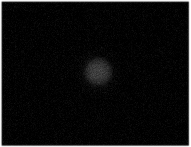 5 to 10 fps (200 to 100 ms). Do not hesitate to favor speed over exposition : the low dynamic of the raw frames will be compensated by their number because the rotation of the planet does not really count. We are going to make very long video captures, from 15/20 to 30/45 in order to get the best possible signal to noise ratio while avoiding to have the image blurred by the seeing. I now routinely get 5000 to 10000 raw frames for each filter. At right is an “excellent” raw obtained under superb seeing with the R filter on 16th september 2012 with my 250 mm at F/32 (oversampled) and a PLA-Mx camera. Time exposure is 150 ms (7 fps) with high gain but the final video recorded 11000 frames in 30 mn. Despite the underexposure the elliptical shape is already perceptible.
Must I use RGB or LRGB ?
As for Neptune, the use of the Luminance/RGB method requires the use of an Atmospheric dispersion corrector, otherwise the L image will almost certainly fail, unless you can observe the planet at a very high altitude of course. The problem on such a small disk is that the planet will not only get blurred without ADC: the global shape of the planet will be distorted, elongated following a north/south line. So if the planet transits at less than 60/70° at your location and you don’t have an ADC, the LRGB method is maybe not the best solution.
If you have the ADC, then try to image in LRGB but for Uranus, my preference still goes to the RGB method and there is a good reason for this…
When I had my very best night on Uranus last year on october 30th, I have been pleasantly surprised to see that the equatorial belt that many of us had imaged on the previous months was visible with the Astronomik R filter ! This means that it is possible to have details on a color image of Uranus if superb conditions of seeing and imaging are fulfilled. But this is where I doubt of the interest of LRGB : ok the L filter provides a much brighter image, but its level of contrast is extremely weak and I am not sure that the R belt will be visible mixed together with G and B inside the L image. 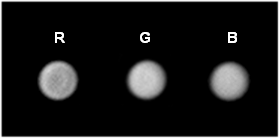 More over, it would require a perfect setting of the ADC and this is not easy to achieve as well. From my various experiences in 2012 (I had several nights of excellent seeing) correctly shaped L images have been hard to get and my best result is an RGB.
At left are the original R, G, B frames of the above RGB (processed, resized 150 %). The equatorial belt is visible in R. The elliptical shape of the planet is more apparent in G (because the atmosphere of Uranus is less absorbing in G) and still well visible in the usually difficult B image.
I have not tried a color camera for imaging Uranus in colour. It should work well under good conditions, although it could be less efficient in revealing the weak belts visible in IR light…
Adjusting the color balance of Uranus
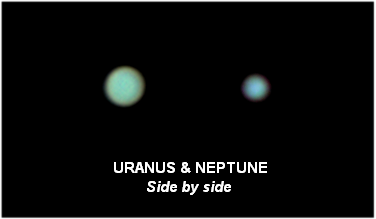
Finally, what is the “exact” color of Uranus ? Often the images show a noticeable blue tint but this do not look correct to me. Visually under a transparent sky, the planet has a clear greenish hue in comparison with the blue of Neptune. I have been able to observe visually both planets one after the other in 2010 and the difference was obvious. Here are compared side by side my best images of them with the color balance carefully adjusted.