
WinJupos is well known for its functionalities about image processing. But its offers as well a performing module of ephemeris. Here is how to get started
Setting the software
To have the ephemeris correctly working, you need to enter your geographical coordinates. Our terrestrial longitudes and latitudes determine the precise rising and setting time of celestial objects as well as their altitude in the sky. On the upper right corner of the module, you can manually enter the coordinates, but you can above all save them, and save several ones! This is welcomed if you benefit from more than one observing place found remote from your most common place.

For a first recording of your observing place, enter your coordinates and then open the drop-down menu. Choose “save observing place” and call it as you want. Then you will be able to just load the observing site to automatically set the adequate coordinates. Beware that the longitude is set in + (east of Greenwich meridian) or – (west of Greenwich). The latitude is understood in minutes (0 to 60). On the web, most of the time the coordinates of a terrestrial point is given in E/W for longitude and in fraction of 100 for the latitude.
WinJupos allows you to have the module working in real time: choose “animation” at right.
What are the most important ephemeris?
The ephemeris are quite extended but all do not have the same utility.
Let’s start with the rotational systems of longitudes. They allow us to know what part of a planet is visible at the chosen time. There can be several systems… the most simple planets are those that show us their solid surface: Mercury and Mars. In this cas there is only one system of longitude, just like on Earth. As an example on Mars, the meridian of Syrtis Major is around 290°. 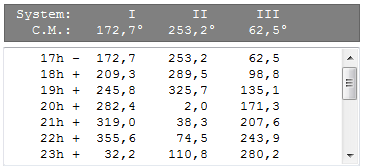 Things complicate a bit for Venus: the planet also as a solid surface whose longitude is calculated with a system I, but we can’t see it (except when we try to image its thermal emission). However we must add a system II that follows the rotation of the details visible in ultraviolet (in around four days). Situation is even less simple for the gas giants. Jupiter has three systems : the first one follows the drift of the equatorial zone, the fastest jet on the planet. The second system follows the rest of the globe. The third one is based on radio emissions, is used mostly by scientists and is of little interest for amateurs. On Saturn the situation is different as nobody does not use anymore the system II (which has no real significance), so we use system III for all latitudes except for the equatorial zone that is followed by the system I just like Jupiter.
On the left of the ephemeris module, the grayish part displays the different systems of longitude following the required UT date and time. On the white part you take a quick look at the evolution of meridians for the following hours.
Physical data
The right side shows different physical data. In the gray header, you can learn how high is the planet at the chosen UT date and time. Along with the rising, meridian transiting (culmin.) and setting time, this can be important to prepare an observation. The rising and setting time of the Sun are displayed as well to compare with those of the planet !
The diameter is the angular size of the planet in the sky. This influences the level of resolution you can expect for an observing or imaging session.
The elongation is the angular distance to the Sun. 180° is the maximum at opposition. 90° is the quadrature (for outer planets).
The phase is the percentage of the illuminated disk by the Sun as we see it from Earth. Every planet do present a phase as seen from Earth, except Uranus and Neptune. It is negligible for Jupiter and Saturn, but it does count for Mars, Venus and Mercury because the invisible part can be very important.
To end the tour on the most well-known ephemeris, the magnitude is displayed as well.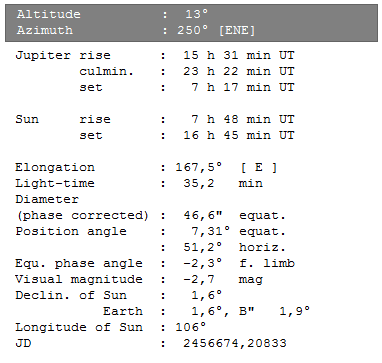
With the declination of Sun (Ds) we learn however an important notion but not widely known. This value designed the angle formed by the line between the Sun and the observed planet, and the equatorial plane of the latest. For example if Ds = 10°, this means that the Sun shines vertically over the latitude 10°N (at south, the Ds values are negative). This teaches how does the Sun illuminate the planet.
The declination of Earth (De) is the same idea but this time the angle of view is from Earth. If De = -25°, this means that the latitude of the center of the planetary disk as seen from Earth is found at 25°S. De and Ds can be interesting to study together: if the value of the sign (+ or -) is the same for both, then we see mostly the sunlit hemisphere of the planet…. but sometimes the signs are opposed: this explains why sometimes we can see the “shadowy side” of the rings of Saturn for example. It can be important for Mars as well because if the values are opped, this means that we fall or winter hemisphere of the red planet is tilted toward us.
Finally, the longitude of Sun (Ls) is the last important notion to keep in mind: it defines the season of the observed planet. Ls = 0 is the vernal equinoxe (northern spring equinoxe), 90° northern summer solstice and so on (180°, 270°). This is very important for Mars (I will talk about it later to prepare the 2014 opposition :) ) because the Martian phenomena follow a seasonal cycle. But it counts as well for Saturn (the storm activity looks to be linked to the season) and maybe as well for Uranus and Neptune… but we will need time to verify this!
This article will be followed by a presentation of the graphics settings.


