
After the first part where we learned how to get started with WinJupos’ephemeris, here is the second part where we’re going to learn how to set the graphic simulation, which is one the best tools!
Choose your map
WinJupos is delivered with various map projections for every planets as well as their main moons taken from orbiters, sometimes from amateur data (Messenger for Mercury, Viking for Mars, Cassini for Jupiter and Saturn, Voyager 2 for Uranus and Neptune). To change map or if this is the first time you use the software, you first need to set the “Options” tab:
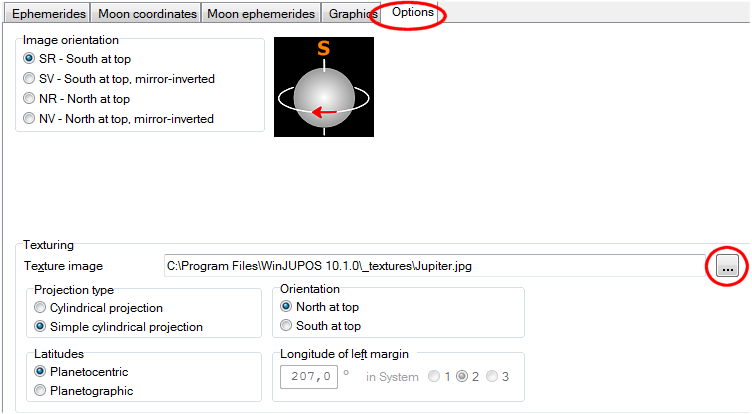
Find the map with the squared button at right. Then choose the right parameters under “Texturing”:
The projection type is very important following the chosen map to have the details at the right latitude. To make it simple, the Lambert projection is when the poles look vertically squeezed, and the simple projection when to the contrary they look stretched in latitude scale.
The orientation says if the map is north or south up as you can see it “as it is” on any software.
The latitude is a bit less important. The WInJupos maps are planetocentric.
The longitude of left margin now this is fundamental for planets where we can see details whose position in the graphic will be “real”, those are of course the planets with solid surface (Mercury, Mars, and the thermal emission from the venusian surface), but as well the Great red spot of Jupiter, WinJupos being the only software that automatically sets the GRS longitude (the longitude of left margin is automatic as well in this case). Choose the system of longitude: 2 for Jupiter, 1 for Mars, 1 for the thermal surface of Venus. For Saturn, Uranus, Neptune and Venus in UV the simulations are imaginary and setting the longitude is not important. The left longitude of WinJupos original’s maps can be found in the “Maps” text file of the map directory.
Then on the upper part, choose the image orientation: north or south up for classical telescopic vision, or “mirror-inverted” if you use a diagonal.
Using other maps
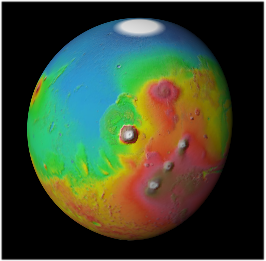
You can use a different map if you want to, providing its settings are known and can be recognized by WinJupos (especially Lambert or simple projection, other formats will not work). As an example, you can upload a jovian or Mars map you have made with your own images, or from other amateur images! On Mars you can use a relief MOLA map (see at right with the Tharsis volcanoes well positioned!), or a Magellan map of Venus…
Setting the graphics
Now let’s set the simulation itself.
Load the map with textur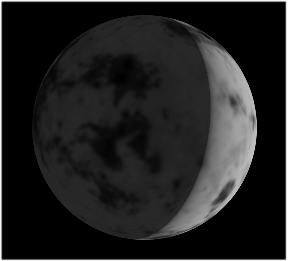 ing. then choose the options you want: Shading produces a “visual” gradient of luminosity, but can make the borders dark. Unillum. surface will draw the part of the planet that is visible from Earth, but not illuminated by the Sun. This can be interesting for Mars, to predict the arrival of details or clouds (I think it can be nice during dust storms), and it is of course important for Venus to see the thermal signal of the surface (see at left!).
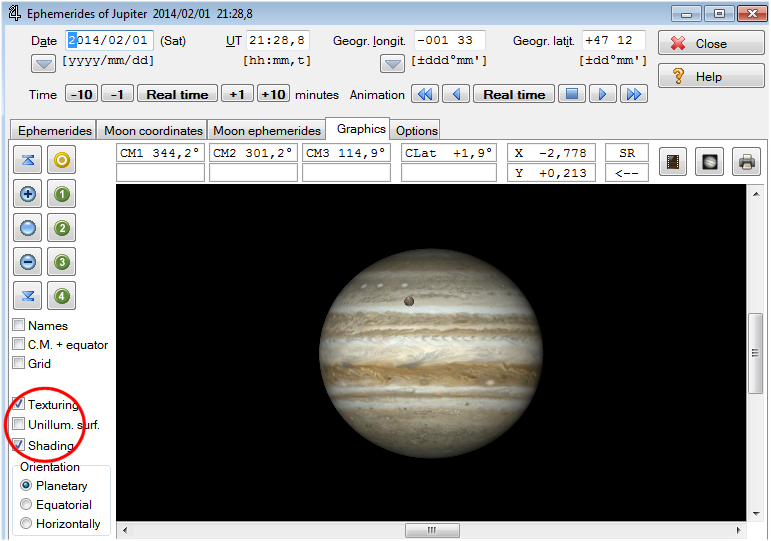
Orientation tilts the polar axis to the vertical (planetary), as seen in the sky (equatorial) or from your local observing site on Earth (horizontal).
Names is useful to read the moon’s names. CM+equator draws equator and central meridian, grid applies a grid of geographic coordinates.

At upper left, some buttons allow you to navigate inside the simulation. Up and Down arrows are minimal and maximal zoom, + and – intermediate zoom steps. These functionalities are interesting to see the surface of the moons in high resolution. If you get lost, click on the middle blue button, you will return to a standard size. In the right column, you find buttons that allow you to center the body you need to see. The yellow button is for the main planet, and the numbered green ones for the moons (pass your mouse over the button to see the moon’s name).
On the upper part of the window, you can animate the simulation, in real time or with steps of +/- 1 or 10 minutes. Finally, with the following buttons:
![]()
You can record an animated sequence, an ephemeris graphic, or print the image.


